Pages

Sunday, January 29, 2012

Week Four: Barbie Gets A New Dress

My daughter's favorite toy is her Barbie. If you look really closely you'll notice her hair is more nasty dread locks than silky smooth tresses... but the love of a two year old has no bounds. I try to brush it out occassionally but J screams. Dread locks it is then.

I figured that since barbie only has one outfit I would make her another so J could play dress up with her. I found this cute cupcake shirt below with matching polka dot tights for Jordan's birthday back in September. Since we live in Texas, and it was still quite hot here, I removed the polka dot sleeves and saved them "just in case." Well, just so happens I found a use for one of them this week!

Since I already had a hem from the sleeve I left that in tact as the bottom of the dress.
My fabric was a stretchy material so no need to worry about adding velcro in the back. Just pin in the desired shape...
Sew along the pins...

and trim the edges. I simply folded over the excess on top and used fabric glue to hem.
Turn inside out and KA-POW! Barbie has a new dress!!! And it slips on and off nice and easy, perfect for a toddler at play!
That was too easy I had to make her an accessory to go. I had some left over fabric from a belt buckle I made for J when she was a cowgirl for Halloween...
and now barbie has a belt!
Now if only the other sleeve was big enough to make one in my size!
And after all my hard work, you know what the best part was? J absolutely... hated it! Haha! Bet you thought I was going to say she loved it, huh? Nope she cried, tore it off and screamed until I put Barbie's old dress back on. An oldie but a goodie I guess. Oh well, better luck next week Mommy. =)

Tuesday, January 24, 2012

Mini Mid-Week Craft: Fabric Flowers

Sooooo... I know I said I was done with the box from week one but sometimes I just can't help myself. Perfectionism? OCD? Call it what you like! I came across this tutorial for burlap roses and I couldn't resist. They literally took me no more than a half hour to make all three. I mean, ridiculously easy! All it takes is fabric, a glue gun and some felt. I had everything on hand so here is my improved box! I think it looks much nicer than the bow I had before. Check out the tutorial here.


Saturday, January 21, 2012

Week Three: Bathroom Remodel

So, this may not be a craft exactly but I have been dying to bring some organization into the stall in our bathroom! I have had that silver above toilet shelving since college and it was begging for retirement! We also have had the rest of the bathroom painted blue for the last two years so it was about time I finished.

The blue I used is Valspar Signature Colors BirdBath Gray. We have had the unfinished builders grade cabinet sitting in our garage for 3 months or so now which I painted with a primer and basic white. For the cabinet, I started with a paint brush but it seemed to leave a lot of lines so I moved on to a craft sponge brush I had handy. Hope you like it... I know I do!


Notice the sticker that was still on the toilet? Yes, that has been sitting there since we moved into the house and neither my husband or I ever tried to remove it because we figured it must be really stuck on there if the previous owners never removed it. Yeah... it peeled right off. In one piece. Guess it goes to show that you never know until you try! =)

Saturday, January 14, 2012

Burlap Inspiration

Since I mentioned in this weeks post how I am loving Burlap right now, I thought I would post some cute inspiration!

burlap Burlap placemat Pinned Image Burlap pillows Pinned Image Pinned Image
Pinned Image Pinned Image
Pinned Image

Week Two: Cover Box with Fabric

So, after much searching for the right fabric (at the right price) for my new hallway box, I scored! At less than $3 a yard I was thrilled to find a muted green burlap! I've been seeing some pretty art and decorations with Burlap lately so I was excited to give it a go.

All I used for my project was last weeks box, fabric, a glue gun and some ribbon to finish it off! Now, it did take me a nice chunk of time to wrap that puppy but, like I said, the box is pretty big and I didn't really have a wrapping game plan to start with. But, lucky for you, my pictures should give you a clear idea of where to start. Enjoy!


Start by ironing and laying out your fabric on the ground. You will need to cut two pieces. A piece that covers the bottom and front of the box. And another piece that covers the two sides.
You will need to leave a good 4+ inches on the top of the pieces to fold over and inside the box.
Start by cutting around the point of the 90 degree angle, leaving an inch or so flap. Glue the two excess flaps to the two sides.

Then glue the rest of the bottom fabric in place. Leave the front flap unglued until the end.
Now get your second piece of fabric to begin with the sides.
Glue the fabric to both sides and once in place trim the edges.


I chose to glue right along the edge to prevent fray but if you have a thinner fabric you can fold an inch under for a finished edge.

Once the sides are in place, trimmed and affixed, fold the top flaps inside your box and glue in place.
Now affix your front and trim and glue sides in place. Fold excess inside the box, glue and you're done!!! I finished off with a ribbon since I pick a neutral fabric.
Now you can fully utilize the space you have in that tiny closet of yours!

Saturday, January 7, 2012

Week One: Rectangular Box to Triangular Box!

So, it turns out, that spending hours looking at cool craft and DIY ideas on Pinterest does not a crafty person make. In light of this recent revelation, and the pressure of a New Years resolution still looming overhead, I have combined said problems and... a blog was born! The plan is one craft a week, big or small, to keep the creative juices flowing. And, we're off!

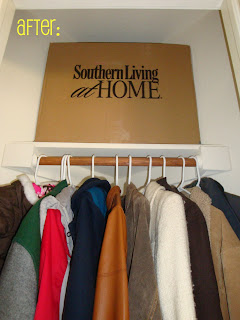
My craft of the week is all about organization! Our tiny entry way closet has an even tinier triangular shelf on top that has been making me crazy since the day we moved in! As you can see in the before picture below, there has been a rectangular box hanging off the edge and overflowing with wires for, oh, only two and a half years! Oh, the shame! Of course, my husband assures me that all of those wires are necessary and important so the ideal of pretty-by-purging, turns into the ugly stepsister, hoarding-and-hiding. But, I digress...

So, here we go! A super simple DIY project to take one big ol box and make it fit in that awkward, triangular space!


The most important thing is to measure the length of the widest part of the shelf and make sure the front of your box is a few inches shorter. How many inches will depend on how large the shelf is but in general the bigger the box the more inches shorter. For instance, for a shelf that is 20 inches across, I made the box front 17 inches, so three inches shorter. My shelf, pictured below, is 31 inches so made the box front 26 inches, which is 5 inches shorter.
Well, hey there box that's been sitting around my house...
Cut off one of the smallest sides.
Cut open the bottom if it is taped.
Now, cut off the top flaps.
Fold the three sides together until the back point is a 90 degree angle. You will need a 90 degree angle for it to fit correctly on the shelf.
One side should be about two inches longer than the other so you can overlap as shown right by my hand.
Make sure you have that 90 degree angle, tape that sucker together and... VOILA!!!

Mine sits just an inch and a half from the edge of the shelf!


(Oh and the step by step pictures are from a smaller box I did previously just in case you were wondering how I got my box to grow and sprout a name!)

Next week, I will do a tutorial for covering your box with fabric because, though it fits now, it's still a not so pretty brown box!!!